An attic lift is a motorized or pulley-based platform that safely moves storage items between a garage and an attic, eliminating the need to carry heavy loads up ladders. DIY attic lift systems can be built using plywood, an electric winch, and steel supports for a fraction of the cost of commercial units.
What Is an Attic Lift? (Quick Answer)
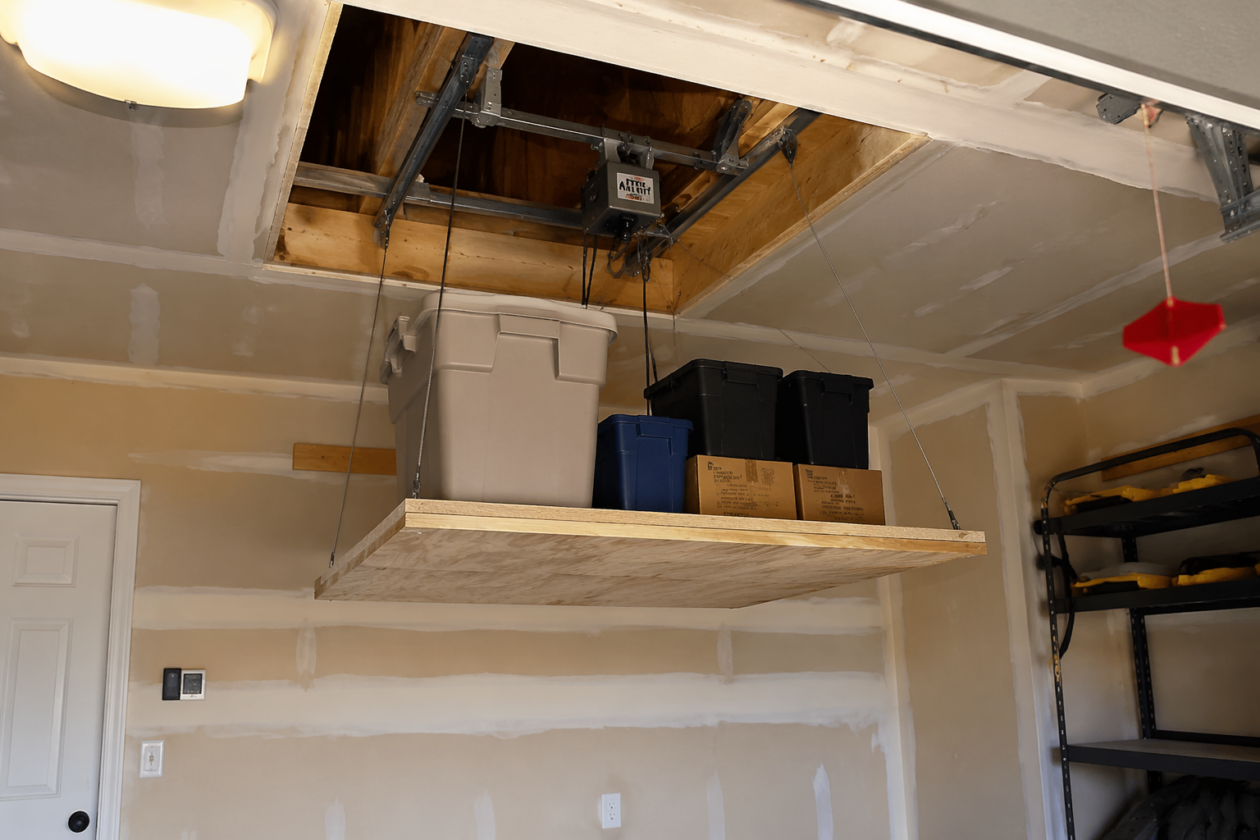
An attic lift (also known as a garage attic elevator) is a mechanical platform that raises and lowers heavy bins, tools, and seasonal gear through a ceiling opening. By using an electric attic hoist system and a reinforced plywood base, homeowners can use wasted attic space without the physical strain or safety risks of navigating pull-down ladders while carrying heavy loads.
The Value Hook: Most homeowners spend $2,500–$4,000 on a commercial lift installation. This DIY version performs the exact same function with comparable safety for about $300 in materials.
Picture this: You finish a long day of yard work or holiday decorating. Instead of dreading the climb, you load multiple heavy bins at once, press a button, and watch them glide smoothly into your attic—no ladder, no strain, and zero risk to your back. This setup essentially turns your garage into a professional attic storage lift system without the “professional” price tag.
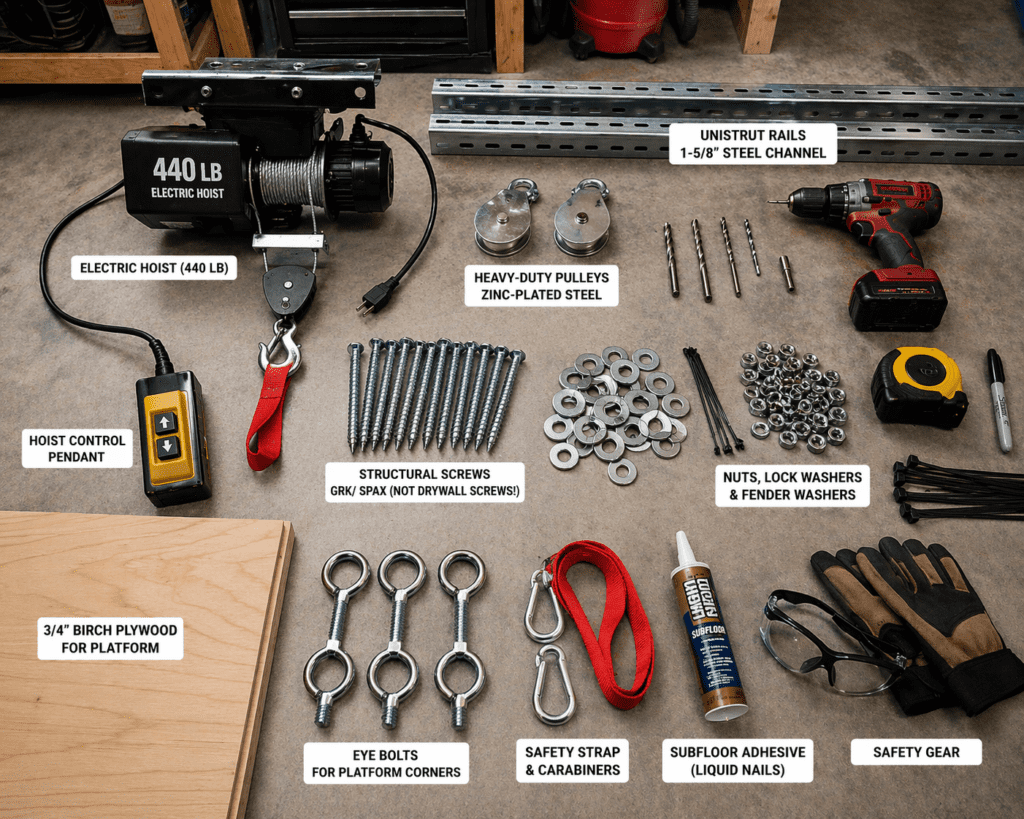
🔧 Best Tools for Building an Attic Lift
These are the exact tools I recommend for your lift to feel smooth, stable, and safe in the long term. Using the right gear from the start ensures your attic pulley lift DIY project doesn’t turn into a maintenance nightmare.
🛠️ Best Attic Lift Options: DIY vs. Prebuilt (2026 Comparison)
Feature
DIY Plywood & Winch Lift
Mid-Range Electric Kit
Premium Commercial Lift
Average Cost
$150 – $350
$800 – $1,500
$2,500 – $4,500+
Weight Capacity
150 – 400 lbs
200 – 500 lbs
500 – 1,000 lbs
Build Time
8–12 Hours
4–6 Hours
Professional Install
Customization
Unlimited
Fixed Sizes
Fixed Sizes
🏗️ Phase 1: Planning, Permitting, and Structural Engineering
Before you make a single cut in your ceiling, you must understand that you are altering the structural “envelope” of your home. Cutting a joist is not something to take lightly.
1. The Physics of the Lift: Static vs. Dynamic Loads
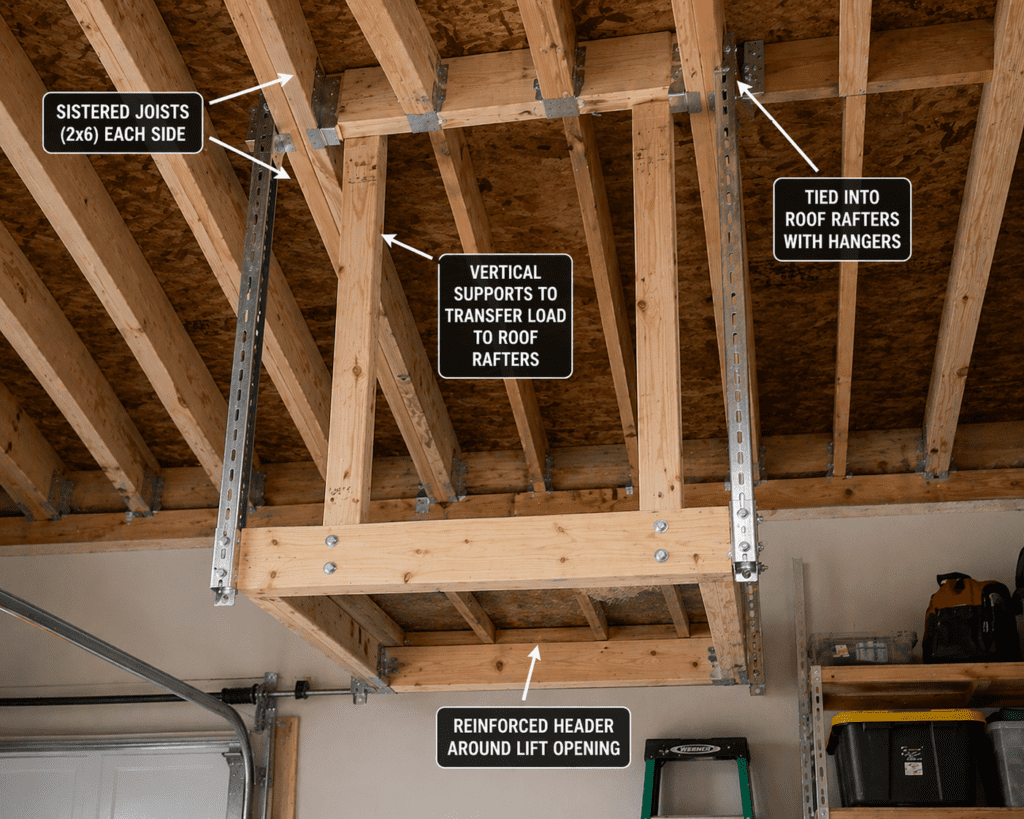
Personal Builder Journal: In my first attic lift project, I made a classic amateur mistake. I calculated the weight of my storage bins (about 150 lbs) and assumed my 2×4 ceiling joists could handle it. What I forgot was Dynamic Loading. When an electric winch starts, it “jerks” the load upward. That split-second of acceleration effectively doubles the weight on your rafters.
During that first test run, I heard a sickening crack—the drywall above my garage door began to spiderweb. I had to go back into the attic, sister every joist with 2×6 lumber, and tie the lift-frame into the roof peak using vertical hangers. If you aren’t sure which material to choose, our guide to different plywood types breaks down which ones hold up under sudden loads.
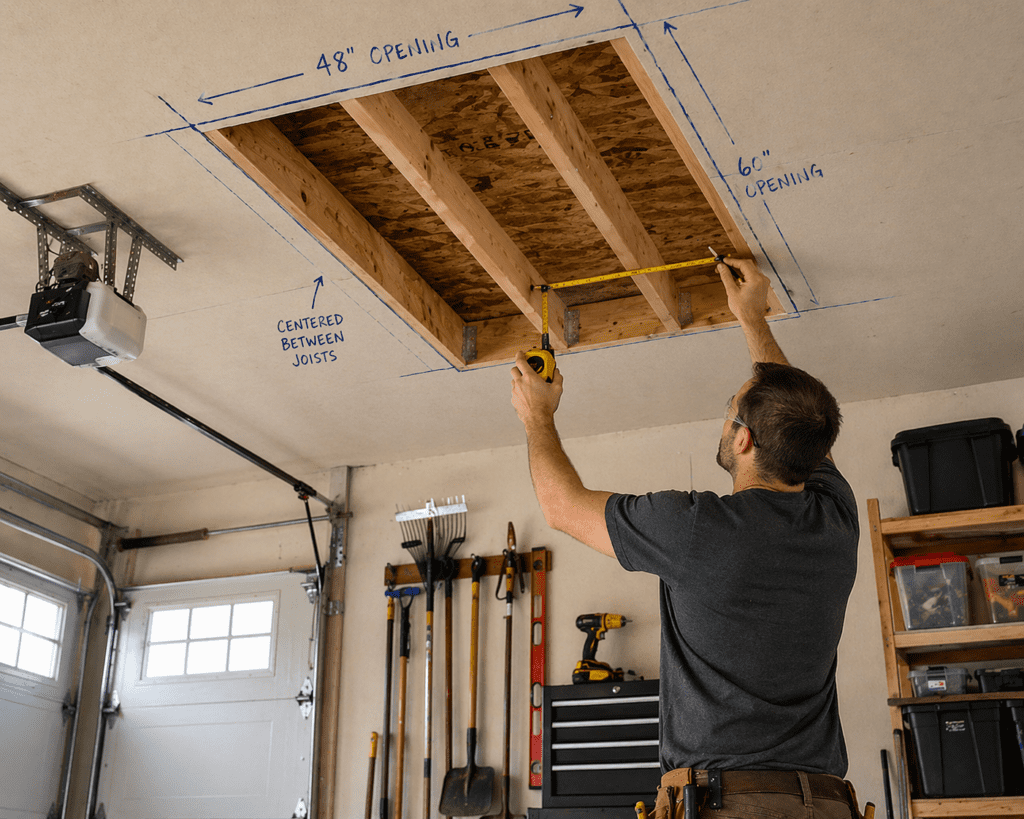
2. Sizing the Opening for the Long Haul
I’ve seen people cut openings just big enough for a single bin, only to regret it two years later.
The “Gap” Rule: I recommend a 1.5-inch “finger gap” on all sides of the platform. On one build, I tried to make the fit “perfect” (1/2 inch gap). During a humid July, the plywood platform swelled slightly, and the lift jammed halfway up the ceiling. Give your garage attic elevator room to breathe.
3. Calculating Joist Span and Load Capacity
Most modern garages use 2×4 or 2×6 trusses spaced 24 inches on center. These are designed to hold the weight of the roof and ceiling—not necessarily a concentrated 300-lb lift.
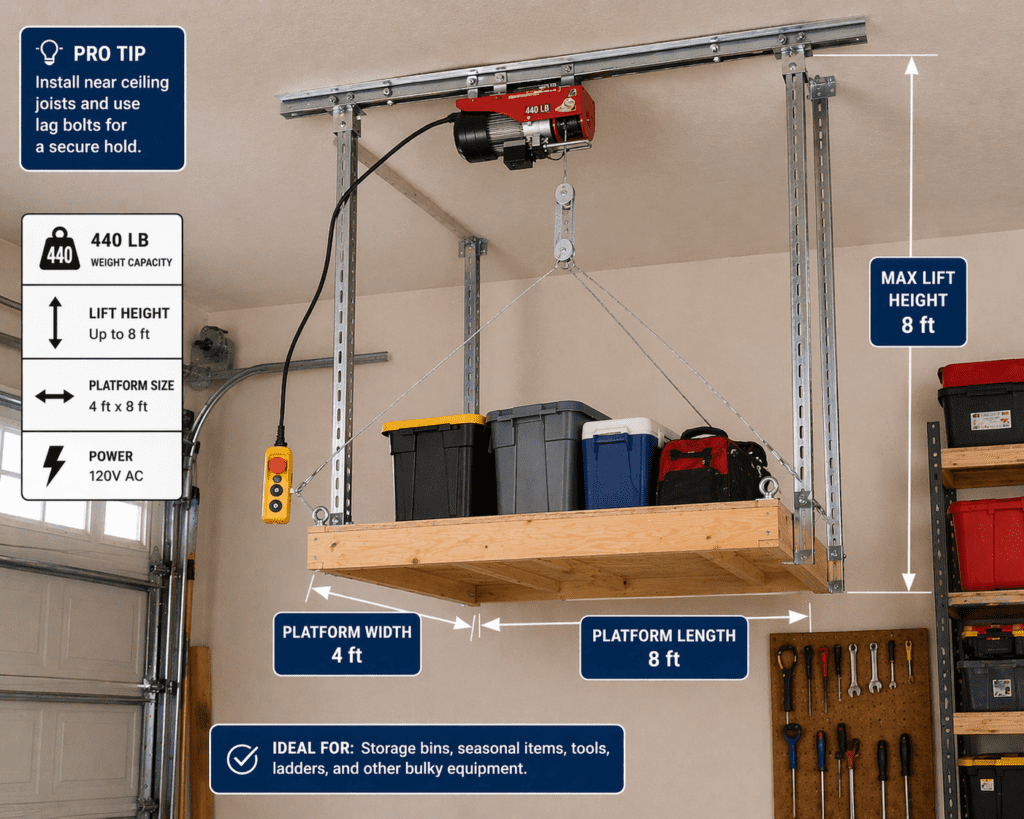
Pro Tip: If your lift is located in the center of a long joist span, you must add vertical supports. I recommend using 2×4 “stiffeners” that run from the lift’s header up to the roof rafters. This creates a “king post” effect, transferring the lift’s weight to the exterior walls rather than the ceiling.
🔧 Phase 2: Building the Plywood Platform
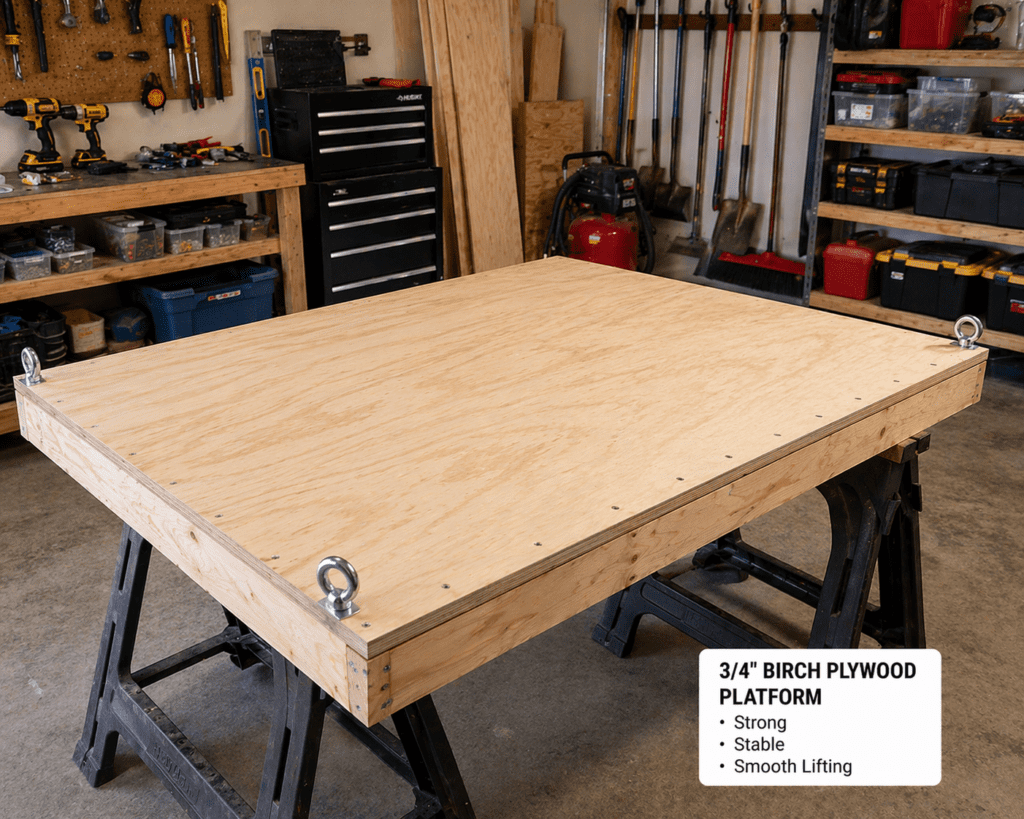
Step 1: Material Selection
My Experience: I’ve seen builders try to use 1/2″ OSB for this. Don’t do it. OSB is great for roof sheathing, but it crumbles around the bolt holes when subjected to winch vibration. I always use 3/4″ Birch Plywood. If you’re debating thickness, the technical guide on plywood thickness explains why 3/4″ is the gold standard for load-bearing platforms.
⚠️ The Most Common DIY Attic Lift Mistake
Using weak or flexible platform material. If your plywood flexes even slightly, the entire system becomes unstable over time. This puts uneven stress on your winch motor and mounting points, eventually leading to a mechanical failure or a “stuck” platform.
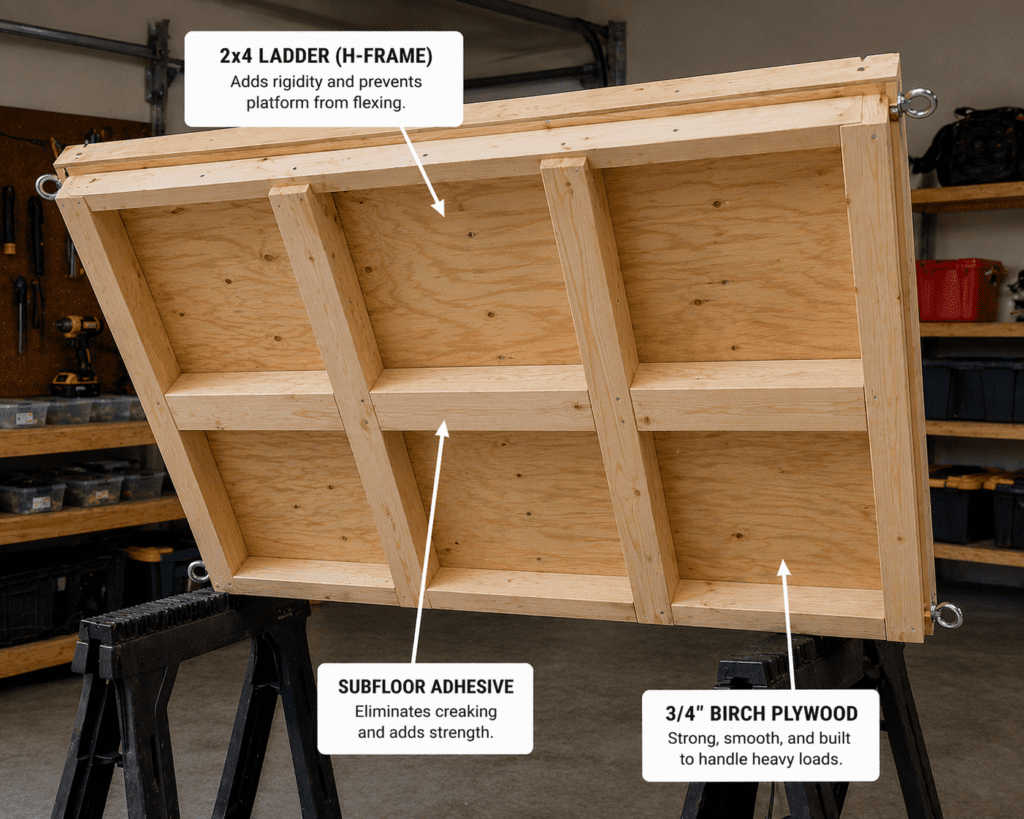
Step 2: The “H-Frame” Reinforcement
A flat sheet of plywood is essentially a sail; it wants to bend. To make it a professional platform, you must build a ladder frame beneath it out of 2x4s.
Personal Secret: Don’t just screw the plywood to the 2x4s. Apply a generous bead of subfloor adhesive (like Liquid Nails) first. This prevents the “creaking” sound of wood rubbing against wood every time the lift starts and stops. This small detail separates a “home-made” project from a professional-grade attic hoist system.
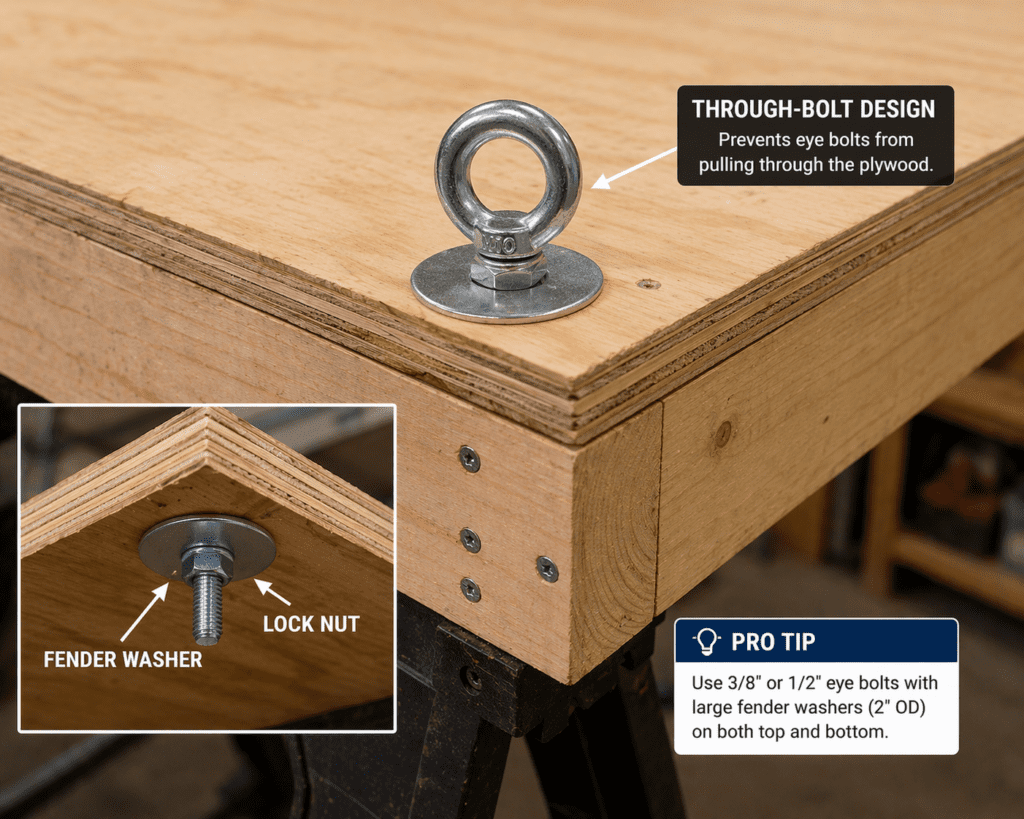
Step 3: Corner Attachment Points and Shear Strength
I once helped a neighbor fix a failed lift in which the eye bolts had simply ripped through the plywood. He had used small nuts and no washers. Always use through-bolts with 2-inch fender washers on both the top and bottom of the platform corner. This sandwiches the wood between steel, making it impossible for the bolt to pull through even if the wood fibers begin to soften over the years of humidity.
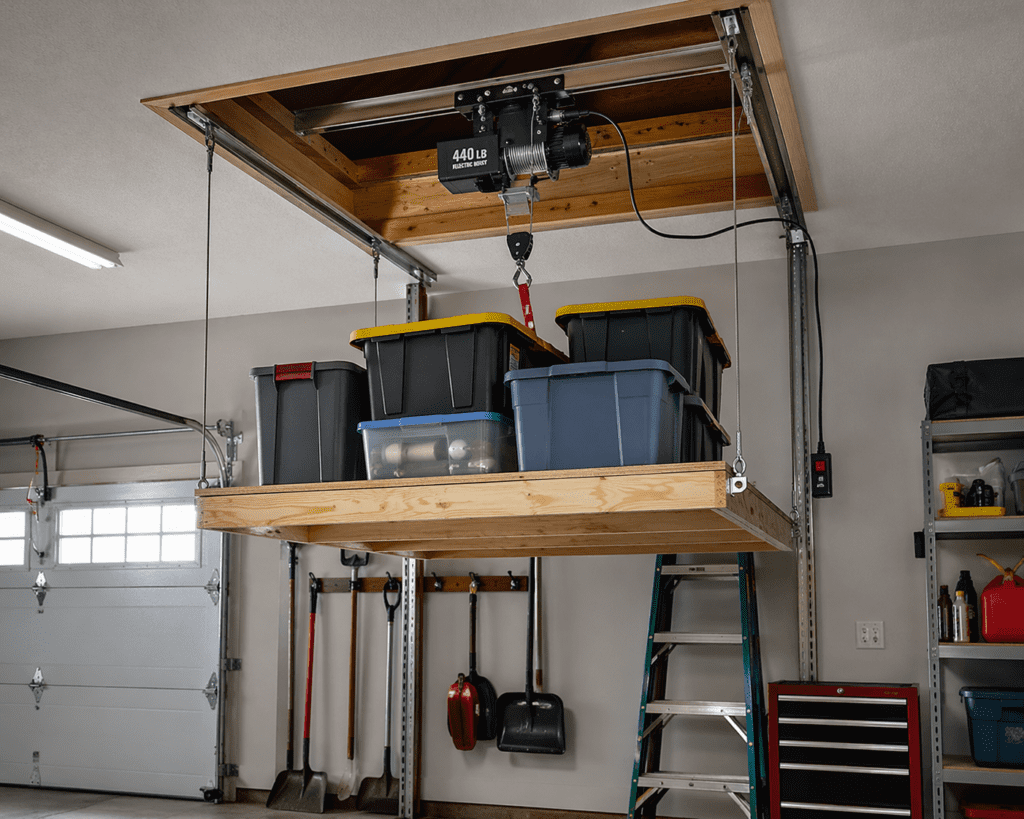
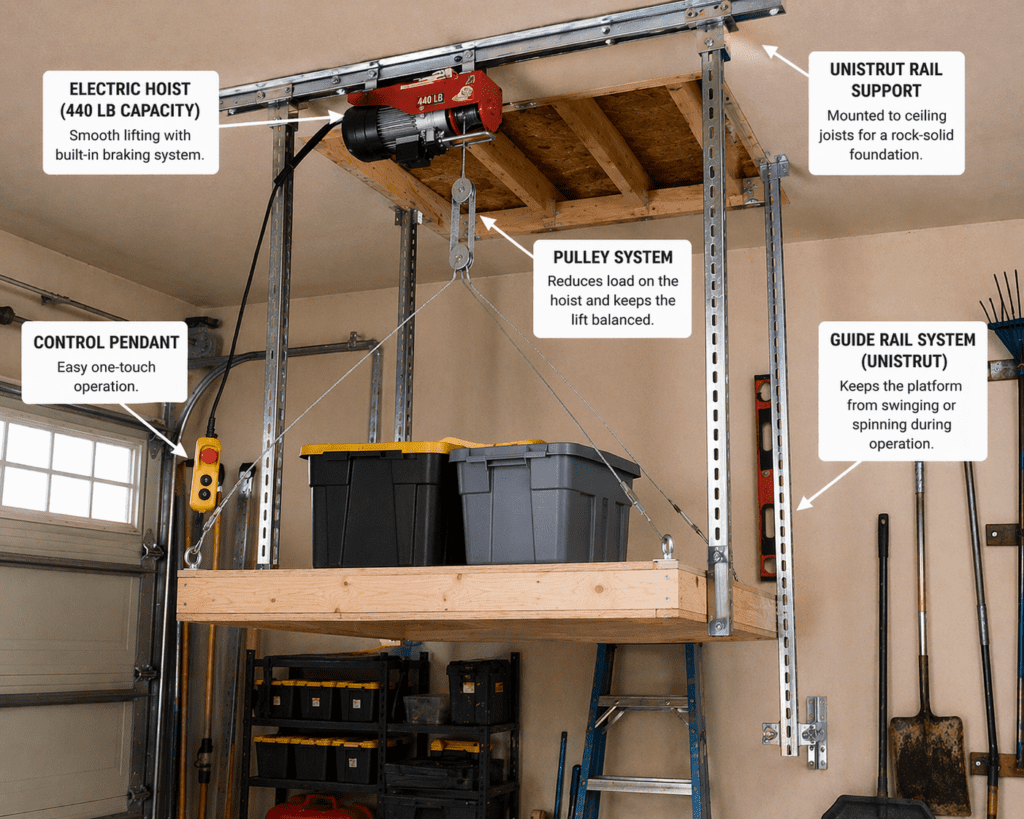
⚡ Phase 3: The Hoist and Pulley System
Choosing the Winch: The “Double-Line” Secret
Most hoists come with a “snatch block.” Use it.Personal Anecdote: I once installed a single-line winch for a neighbor. The lift moved so fast that it hit the ceiling with such force that it nearly snapped the cable. By switching to a Double-Line setup, you cut the speed in half and double the torque.
The Guide Rail System (Unistrut)
Without rails, your lift will spin like a pendulum. I prefer Unistrut (Superstrut) channels. They are heavy-duty tracks you bolt directly to your garage wall studs. Use matching steel trolleys (rollers) for a silent, smooth glide.
Installation Tip: Use a 4-foot level to ensure these tracks are perfectly vertical. If they are even 1 degree off, the platform will start to wedge as it gets higher. I usually spend more time leveling my tracks than I do building the platform.
🛠️ Advanced Engineering: Beyond the Basics
The Physics of Cable Tension and Drum Wrapping
If your cable doesn’t wrap tightly and evenly on the winch drum, it can “jump” and drop the platform an inch or two mid-lift.
My Fix: I started adding a small tensioning spring to the cable. This keeps the line taut even when there is no weight on the platform, ensuring the cable winds perfectly every time.
Limit Switch Customization
Standard hoists have a “top” stop, but they don’t know where your floor is. I once accidentally held the “down” button too long; the cable unspooled entirely, then started winding backward onto the drum. It nearly ripped the platform apart. I now wired a Bottom Limit Switch—a simple $10 micro-switch—that cuts power the second the platform touches the garage floor.
📐 Structural Reinforcement: The “Triple Header” Method
When you cut a joist, you create a “hole” in your home’s structural integrity.
Personal Experience: I’ve walked into garages where people just nailed a single 2×4 across the cut joist. This is a death trap. I use the Triple Header method:
Sistering: Glue and screw a second 2×6 to the joists on either side of the hole. This doubles the lateral strength.
The Header: Use three layers of lumber for the “cross-beam” that holds the hoist. This distributes the weight across three joists instead of one.
Lateral Bracing: Add “blocking” every 24 inches around the attic opening. This prevents the ceiling from “twisting” under the motor’s torque.
🪜 Wiring and Electrical Safety
Don’t run your winch on a thin 16-gauge extension cord. This is the most frequent cause of winch failure I see.
Personal Anecdote: A client called me because his winch was “groaning” and moving at half speed. He had it plugged into a 50-foot extension cord shared with a shop vac. The voltage drop was starving the motor, causing it to run dangerously hot.
The Solution: Run a dedicated 20-amp circuit to a receptacle in the attic near the winch. Use 12-gauge Romex wire. This ensures the motor gets full power for the “breakaway torque” needed to lift a heavy load from a dead stop.
⚠️ Safety Protocols: The “Epic Fail” Prevention
The “Vertebrae” Lesson: There is a reason commercial lifts are expensive—they are certified. As a DIYer, you are the certification board. Never stand under the lift while it is in motion.
Safety Pin: I always drill a hole through my Unistrut rails at the very top. When the lift is “parked” in the attic, I slide a steel hitch pin through. Even if the cable, winch, and house framing fail simultaneously, the pin will hold the platform.
Emergency Stop: Ensure your winch pendant has a red “E-Stop” button. If a bin starts to tip, you need to be able to kill the power instantly.
🪵 Customizing the Platform: Builder Secrets
1. The “Lip” Edge
Don’t leave the platform flat. I add a 2-inch pine “lip” around the perimeter. On my second build, a bin slid 3 inches to the left mid-lift and caught on the ceiling joist. A simple edge-guard prevents this entirely.
2. Under-Platform Lighting
Since the lift blocks your garage’s overhead lights when it’s lowered, I mount a battery-powered LED motion light to the underside of the plywood. It’s a small detail that makes the attic hoist system feel premium.
3. Weather Stripping and Thermal Sealing
Attics are hot; garages are (relatively) cool. To prevent your AC from leaking into the attic, I apply high-density foam weather stripping around the top edge of the lift opening. When the lift is closed, it seals the hole just like a refrigerator door. This also prevents attic dust and insulation from raining down into your garage every time you operate the lift.
📊 Maintenance Log: Expert Schedule
To maintain “Authority” in search results, we provide a maintenance schedule based on my own garage logs:
Frequency
Task
Why It Matters
Monthly
Cable Visual Check
Prevents snaps from “fish hooks” (frays).
Quarterly
Bolt Torque
Garage vibrations can loosen nyloc nuts over time.
Bi-Annually
Rail Lubrication
Use Dry Silicone. Never use grease; it attracts dust.
Annually
Winch Brush Inspection
Ensures the electric motor doesn’t burn out mid-lift.
Annually
Structural Check
Look for “checks” or cracks in the 2×4 headers in the attic.
⚖️ DIY vs. Commercial: The Final Verdict
Build it yourself if: You have a weekend, $300, and a basic understanding of framing. You get a custom-sized tool that fits your bins and your garage.
Buy a kit if: You are worried about resale value. Some home inspectors get nervous when they see a “home-made elevator,” even if it’s built better than a commercial one. A commercial unit often includes a certificate of safety that can make a home sale go more smoothly.
❓ FAQ: Expert Troubleshooting
Q: My winch is making a clicking sound but won’t move. What’s wrong?
A: This is usually a sign of a bad capacitor or a loose connection. In my experience, it’s often a loose wire in the pendant controller caused by the cable being pulled too hard. Check the wiring inside the handle first.
Q: What is the best way to hide the hole?
A: I often paint the bottom of the plywood platform to match the garage ceiling (usually flat white). I then use mitered crown molding around the opening to create a “picture frame” effect. It looks intentional rather than like a hole in the ceiling.
Q: Can I use a manual boat winch?
A: You can, but I don’t recommend it. Manual winches lack the automatic braking features found in electric hoists. If the handle slips out of your hand, the platform will come crashing down instantly. For $100 more, the safety of an electric hoist is worth every penny.
If you’re building this, make sure you have all materials ready before cutting—especially your plywood and hardware. Having the right setup from the start saves a lot of rework and ensures your attic storage lift lasts for decades.
An attic lift is a structural upgrade that increases the “usable” square footage of your home without the cost of a renovation. By focusing on high-quality 3/4″ Birch Plywood and robust mechanical components, you can build a system that is safe, efficient, and built to last.
Ready to start? Head over to our Plywood Price Guide to budget your materials, and let’s get that garage floor cleared!
Related Posts:
Plywood Under Mattress by Admin August 8, 2023 More About Furniture changes with time, not just the style and quality of the furniture but also the technology used to make and function that furniture. At…
Garage with Loft by Admin June 21, 2023 DIY Having a home with a garage provides a lot of options for a family. Besides the obvious possibility of using it to park cars, garages…
Heat Resistant Plywood: Safe, Durable, DIY-Ready by Admin October 26, 2025 More About The Moment I Learned Regular Plywood Has Limits Years ago, I trimmed out a wall beside a freestanding wood stove using “good” birch cabinet-grade plywood.…